Portal - Unused Visgroups/2006: Difference between revisions
BlanketOfOne (talk | contribs) (Edited categories) |
|||
| (14 intermediate revisions by 3 users not shown) | |||
| Line 1: | Line 1: | ||
Click [[Portal - Unused Visgroups|here]] to return to the main page. | |||
== Background1.vmf == | == Background1.vmf == | ||
| Line 14: | Line 16: | ||
</gallery> | </gallery> | ||
== testchmb_a_00 == | |||
No unused visgroups. | |||
== testchmb_a_01 == | == testchmb_a_01 == | ||
<gallery> | <gallery> | ||
| Line 38: | Line 43: | ||
== testchmb_a_04 == | == testchmb_a_04 == | ||
<gallery> | |||
File:testchmb_a_04_pit_water_lights.jpg|Pit Water Lights: several yellow lights over the toxic goo. | |||
File:testchmb_a_04_smoke_on_the_waaaterrrr.jpg|Smoke on the waaaterrrr: A func_smokevolume on, you guessed it, the water. The shape indicates that the exit was originally further up and that the indent was added later in development. | |||
</gallery> | |||
== testchmb_a_05 == | == testchmb_a_05 == | ||
| Line 44: | Line 53: | ||
== testchmb_a_06 == | == testchmb_a_06 == | ||
<gallery> | |||
File:testchmb_a_06_cmbnbrush_near_ent.jpg|Cmbnbrush near ent: Several brushes of combine wall stuff near the entrance of the chamber. They paint a different shape to the test chamber's entrance, being that of a turned hallway. | |||
File:testchmb_a_06_cmbrush_near_pt1.jpg|cmbrush near pt1: Additional combine wall bits found in front of the last visgroup. | |||
File:testchmb_a_06_straight_stairs.jpg|Straight stairs: a straight metal staircase that appears to intersect with parts of the nearby pit. The combine metal texturing they have, as well as the misalligned textures on the other sides, show that it's yet another prospekt-era visgroup. | |||
File:testchmb_a_06_8x12 stairs.jpg|8x12 stairs: Some unfinished stairs located outside of the map. Likely used to figure out how the staircase exiting the pit should look. | |||
</gallery> | |||
== testchmb_a_07 == | == testchmb_a_07 == | ||
<gallery> | |||
File:testchmb_a_07_c_lights_rm6_allvis.jpg|c lights rm6: a large group of blue spotlights that point in all directions of the test chamber. Some of these are inside of brushes. | |||
File:testchmb_a_07_c_lights_rm6_onlylights.jpg|The same visgroup, now with only the lights present. | |||
</gallery> | |||
== testchmb_a_08 == | == testchmb_a_08 == | ||
<gallery> | |||
testchmb_a_08_rope_med_platforma.jpg|rope med platforma: A group of ropes underneath the tall platform. This is seen in several early screenshots of the chamber. | |||
</gallery> | |||
== testchmb_a_09 == | == testchmb_a_09 == | ||
| Line 56: | Line 77: | ||
== testchmb_a_10 == | == testchmb_a_10 == | ||
<gallery> | |||
File:testchmb_a_10_fling_ledges.jpg|Fling ledges: 2 Aperture era ledges for players to fling themselves off of. They are not connected to any of the final geometry. | |||
File:testchmb_a_10_old_stairs.jpg|Old stairs: Stairs found near the double button puzzle room. Judging by their textures, they are likely prospekt-era leftovers. | |||
File:testchmb_a_10_3rd room fling hint roomvis.jpg|3rd room fling hint: a panel pushed forward in the 3rd room to help signify to players that they need to fling to get themselves out. The panel itself is much longer than what can be seen with the final geometry. | |||
File:testchmb_a_10_3rd room fling hint roominvis.jpg|Ditto, showing only the panel to showcase how much longer it is than initially visible. | |||
</gallery> | |||
== testchmb_a_11 == | == testchmb_a_11 == | ||
<gallery> | |||
File:testchmb_a_11_c_lights_lab3.jpg|C lights lab3: A number of spotlights in the main chamber showcasing the turrets. | |||
File:testchmb_a_11_infodecal_near_disp1-7.jpg|infodecal near disp1-7: 7 different visgroups of various dirt and burn decals located all over the chamber. It is of note that the final chamber doesn't use ANY displacements, and many of these displacements do not line up with final brushwork. | |||
</gallery> | |||
== testchmb_a_13 == | == testchmb_a_13 == | ||
| Line 65: | Line 96: | ||
== testchmb_a_14 == | == testchmb_a_14 == | ||
<gallery> | |||
testchmb_a_14_rotating_launcher.jpg|Rotating launcher: An early rotating pellet launcher used in the large, turret filled chamber. Its combineesque texture work denotes that it was likely Prospekt-era. | |||
</gallery> | |||
== testchmb_a_15 == | == testchmb_a_15 == | ||
<gallery> | |||
File:testchmb_a_15_smoke_volumes.jpg|smoke volumes: func_smokevolumes that go loosely over the goo. It is worth noting that several of these do NOT line up with the final geometry. | |||
File:testchmb_a_15_old_fire.jpg|Old fire: numerous env_fires and an env_firesource entity inside the incinerator. | |||
</gallery> | |||
== escape_00 == | == escape_00 == | ||
| Line 74: | Line 112: | ||
== escape_01 == | == escape_01 == | ||
<gallery> | |||
File:escape_01_steaming_refuse_overview.jpg|Steaming Refuse: one of the largest, most detailed, and most interesting unused visgroups leftover in the vmfs, this visgroup contains a large portion of the glados chase sequence and defeat. | |||
File:escape_01_steaming_refuse_turrets.jpg|Turrets that the retreating Glados "brain" would call down from the ceiling. | |||
File:escape_01_steaming_refuse_doors.jpg|A large door that would open up when looking at the Glados "brain." | |||
File:escape_01_steaming_refuse_laserturrets.jpg|Rocket turrets, still referred to here as "laser" turrets. | |||
File:escape_01_steaming_refuse_laserredirectionwalls.jpg|Portable walls that would allow the player to redirect the turrets' rockets/lasers into the Glados "brain." | |||
File:escape_01_steaming_refuse_finalroom.jpg|The final room that the Glados "brain" would retreat into. This breakable wall has been highlighted to showcase that the brain would float up, requiring the player to fire at her from underneath, where in which it would then explode and clear an exit for the player. | |||
File:escape_01_steaming_refuse_escaperoom.jpg|The room that the player would escape into. This room was reused for liquidportal_test.vmf. | |||
File:escape_01_steaming_refuse_freedom.jpg|Freedom. The trigger_once seen at the exit would fire a missing fade-to-black env_fade before calling a missing point_clientcommand to exit out of the map. | |||
File:escape_01_old_pillbox_logic.jpg|old pillbox logic: The other unused visgroup of the map, also from when escape_01 was the final map. These logic_cases and math_counters seem to have randomly opened the turret wall traps in the large room later reused for escape_02. | |||
</gallery> | |||
== escape_02 == | == escape_02 == | ||
| Line 81: | Line 130: | ||
[[Category:Maps]] | [[Category:Maps]] | ||
[[Category:Unused Visgroups]] | [[Category:Unused Visgroups]] | ||
[[Category:Portal 1]] | |||
[[Category:Portal_Mappack]] | |||
[[Category:2016 Leaks]] | [[Category:2016 Leaks]] | ||
Latest revision as of 02:14, 28 October 2024
Click here to return to the main page.
Background1.vmf
Walls: Prospekt-era walls used at the end of chamber 00 and the start of the elevator. Also in "elevator" and "cameracantseemee"

Floor: Two floors. They are also in "elevator" and "cameracantseemee"
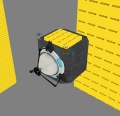
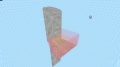
Cage: A cage made using "effects/shieldfield_red." This texture is seen in the first two screenshots of chamber 00 in Jeep Barnett's evolution video. The texture has been recreated in these screenshots in order to better showcase it.
Cage Collsion: Collisions for the red shield cage using invisible brushes.
Invis Cage: Similar to the last visgroup, but with the cage collisions reaching the ceiling.

"Cameracantseemee" and "elevator." Both visgroups are identical. They contain the end of chamber 00 circa the prospekt-era. Missing models have been added in in order to showcase how things would have looked.
Ditto. The soundscape is "portal_intro.tightspace."
Ditto, inside the elevator room.
Ditto, the elevator shaft.
Ditto, inside the "combine_elevator" model. Note that the logic relay, which executes when the elevator reaches the top, points to a non-existent "prop_elevatordoor_ent_rm2," likely the elevator door to the Half-Life 2 elevator model.


testchmb_a_00
No unused visgroups.
testchmb_a_01

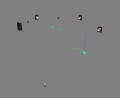
Portal Spawn Sounds: 4 ambient_generics used for portal firing and placement sounds. They all use "NPC_Vortigaunt.ClawBeam" with the "Big Machine" Dynamic Preset.
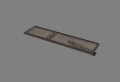
Stair Step: A metal, prospekt-era stair step. It is not connected to anything in the final map.

Annoying Things: 2 trigger_transition brushes and a func_noportal_volume.
A prospekt-era brush portal fizzler.


testchmb_a_02
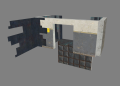
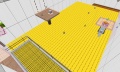
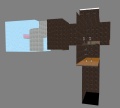
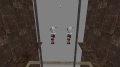
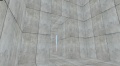
playerclip: Two player clip brushes that denote the original position of the window. The rest of the level has been unoccluded in order to show the difference in location.
Spawn Box: A box spawner that sits next to the final one.
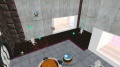
Old Lighting: The original light positions of the map circa its Prospekt-era version.


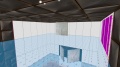
testchmb_a_03
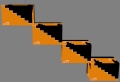
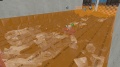
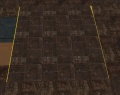
Brackets ropes rm6: Brackets and ropes upon which there would have likely been lights and other such objects circa prospekt-era. They show a much different shape to the test chamber, making it much wider and rounder than the final version.
15 objects: Two mirrored sets of aperture-style stairs located far outside of the map.


testchmb_a_04
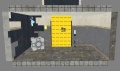
Pit Water Lights: several yellow lights over the toxic goo.
Smoke on the waaaterrrr: A func_smokevolume on, you guessed it, the water. The shape indicates that the exit was originally further up and that the indent was added later in development.


testchmb_a_05
No unused visgroups.
testchmb_a_06

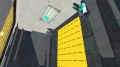
Cmbnbrush near ent: Several brushes of combine wall stuff near the entrance of the chamber. They paint a different shape to the test chamber's entrance, being that of a turned hallway.
cmbrush near pt1: Additional combine wall bits found in front of the last visgroup.
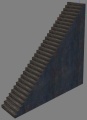
Straight stairs: a straight metal staircase that appears to intersect with parts of the nearby pit. The combine metal texturing they have, as well as the misalligned textures on the other sides, show that it's yet another prospekt-era visgroup.
8x12 stairs: Some unfinished stairs located outside of the map. Likely used to figure out how the staircase exiting the pit should look.


testchmb_a_07
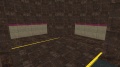
c lights rm6: a large group of blue spotlights that point in all directions of the test chamber. Some of these are inside of brushes.
The same visgroup, now with only the lights present.


testchmb_a_08
rope med platforma: A group of ropes underneath the tall platform. This is seen in several early screenshots of the chamber.

testchmb_a_09
No unused visgroups.
testchmb_a_10

Fling ledges: 2 Aperture era ledges for players to fling themselves off of. They are not connected to any of the final geometry.
Old stairs: Stairs found near the double button puzzle room. Judging by their textures, they are likely prospekt-era leftovers.
3rd room fling hint: a panel pushed forward in the 3rd room to help signify to players that they need to fling to get themselves out. The panel itself is much longer than what can be seen with the final geometry.
Ditto, showing only the panel to showcase how much longer it is than initially visible.


testchmb_a_11
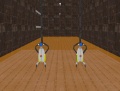
C lights lab3: A number of spotlights in the main chamber showcasing the turrets.
infodecal near disp1-7: 7 different visgroups of various dirt and burn decals located all over the chamber. It is of note that the final chamber doesn't use ANY displacements, and many of these displacements do not line up with final brushwork.


testchmb_a_13
No unused visgroups.
testchmb_a_14
Rotating launcher: An early rotating pellet launcher used in the large, turret filled chamber. Its combineesque texture work denotes that it was likely Prospekt-era.

testchmb_a_15

smoke volumes: func_smokevolumes that go loosely over the goo. It is worth noting that several of these do NOT line up with the final geometry.
Old fire: numerous env_fires and an env_firesource entity inside the incinerator.


escape_00
No unused visgroups.
escape_01
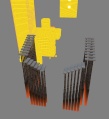
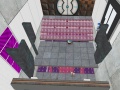
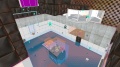
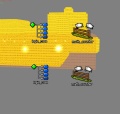
Steaming Refuse: one of the largest, most detailed, and most interesting unused visgroups leftover in the vmfs, this visgroup contains a large portion of the glados chase sequence and defeat.
Turrets that the retreating Glados "brain" would call down from the ceiling.
A large door that would open up when looking at the Glados "brain."
Rocket turrets, still referred to here as "laser" turrets.
Portable walls that would allow the player to redirect the turrets' rockets/lasers into the Glados "brain."

The final room that the Glados "brain" would retreat into. This breakable wall has been highlighted to showcase that the brain would float up, requiring the player to fire at her from underneath, where in which it would then explode and clear an exit for the player.
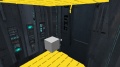
The room that the player would escape into. This room was reused for liquidportal_test.vmf.
Freedom. The trigger_once seen at the exit would fire a missing fade-to-black env_fade before calling a missing point_clientcommand to exit out of the map.
old pillbox logic: The other unused visgroup of the map, also from when escape_01 was the final map. These logic_cases and math_counters seem to have randomly opened the turret wall traps in the large room later reused for escape_02.


escape_02
No unused visgroups.